-
By:
- ida
- No comment
char broil infrared turkey fryer instruction manual
Char-Broil Infrared Turkey Fryer: A Comprehensive Guide
This guide details the Char-Broil Infrared Fryer (Model 10101480), offering instructions for safe and flavorful turkey frying.
It covers preparation, operation, and maintenance, ensuring a delicious meal.
Understanding Your Fryer ─ Model 10101480
The Char-Broil Infrared Turkey Fryer (Model 10101480) utilizes infrared technology for rapid and efficient cooking. Familiarize yourself with all components before operation, including the fryer pot, burner assembly, basket, thermometer, and control panel. This model features registered trademarks like Char-Broil and American Gourmet, signifying quality.
Understanding the fryer’s design is crucial for safe operation. The infrared burner provides consistent heat, while the pot’s capacity accommodates turkeys of various sizes. Always refer to the product guide for detailed diagrams and part identification. Proper assembly, as outlined in the manual, is essential for optimal performance and safety.
Safety Precautions Before You Begin
Prioritize safety when using the Char-Broil Infrared Turkey Fryer. Always operate outdoors, away from structures and flammable materials. Never leave the fryer unattended during operation. Ensure the turkey is completely thawed and dry to prevent dangerous oil splattering. Use caution when handling hot oil and the heated fryer components.
Wear appropriate safety gear, including oven mitts and eye protection. Keep children and pets away from the frying area. Never overfill the fryer with oil, and always monitor the temperature closely. Familiarize yourself with emergency procedures in case of an oil spill or fire – safety first!

Preparing the Turkey for Frying
Proper turkey preparation is key for successful frying. This involves complete thawing, optional brining or marinating for flavor, and thorough drying before cooking.
Thawing the Turkey – A Critical Step
Thawing is paramount for safety and even cooking. A partially frozen turkey can cause dangerous oil splattering and unevenly cooked results. Allow ample time – approximately 24 hours for every 4-5 pounds of turkey.
The safest method is refrigerator thawing, keeping the turkey at a consistent, cool temperature. Ensure the turkey is fully thawed before proceeding; check for flexibility in the joints.
Never thaw at room temperature, as this encourages bacterial growth. A fully thawed turkey is essential for a successful and safe frying experience with your Char-Broil fryer.
Brining or Marinating for Enhanced Flavor
Elevate your turkey’s flavor profile with brining or marinating! Brining involves submerging the turkey in a saltwater solution for 12-24 hours, resulting in a remarkably juicy and flavorful bird. Alternatively, marinating with your favorite herbs, spices, and citrus juices adds depth and complexity.
Ensure the brine or marinade fully penetrates the turkey. Pat the turkey dry after brining or marinating to ensure optimal frying and crispy skin. This step significantly enhances the final product when using your Char-Broil Infrared Fryer.
Drying the Turkey Thoroughly
A completely dry turkey is paramount for safe frying! Excess moisture causes dangerous splattering and can lead to a hazardous situation. After thawing, brining, or marinating, thoroughly pat the turkey dry, inside and out, with paper towels. Allow the turkey to air dry in the refrigerator for several hours, or even overnight, for optimal results. This crucial step minimizes oil splatter and ensures even cooking within your Char-Broil Infrared Fryer. Remember, water and hot oil do not mix – prioritize dryness!

Setting Up the Char-Broil Infrared Fryer
Proper setup is key for safe operation. Assemble components carefully, choosing a stable, level, well-ventilated outdoor location, away from structures and flammables.
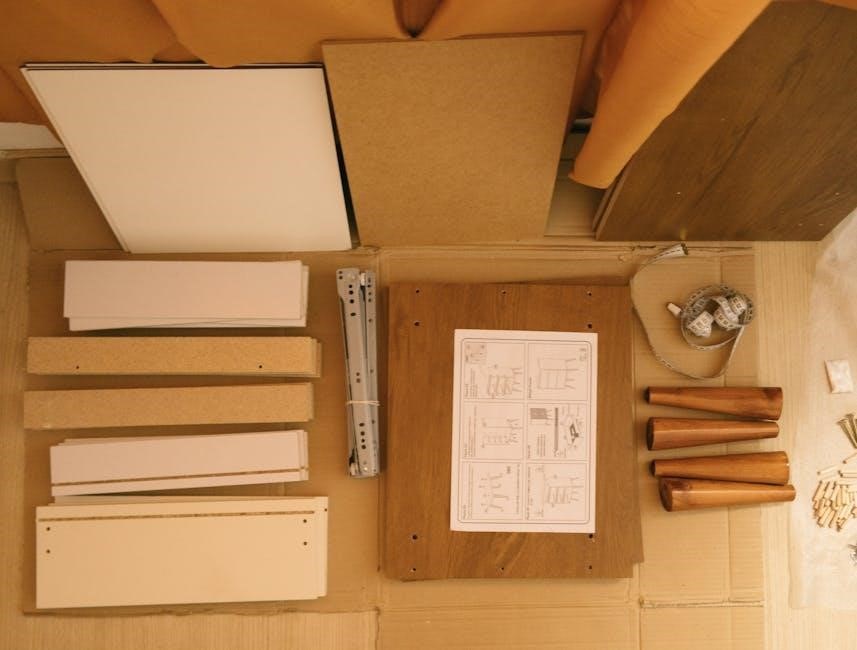
Assembling the Fryer Components
Begin by carefully unpacking all components and verifying everything listed in the manual is present. Attach the legs securely to the fryer base, ensuring stability. Next, assemble the burner assembly and connect it firmly to the gas source, checking for leaks with soapy water.
Position the lifting hook and basket support arm, ensuring they are properly aligned. Finally, attach the thermometer probe and verify accurate temperature readings. Double-check all connections before proceeding, prioritizing safety and a secure assembly for optimal performance during the frying process.
Choosing the Right Location for Operation
Select a flat, stable, non-combustible surface outdoors, away from buildings, decks, and overhanging structures. Maintain a minimum of 10 feet clearance in all directions. Avoid windy conditions, as they can affect temperature control and pose a safety hazard.
Ensure the area is free of flammable materials like dry leaves or paper. Never operate the fryer in a garage or enclosed space. A paved or dirt surface is preferable to grass. Prioritize a well-ventilated area to dissipate heat and fumes safely, guaranteeing a secure frying environment.
Ensuring Proper Ventilation
Adequate ventilation is crucial for safe operation of the Char-Broil Infrared Fryer. The frying process generates significant heat and fumes, requiring ample airflow to prevent buildup. Operate the fryer outdoors, in a well-ventilated area, away from enclosed spaces like garages or sheds.
This minimizes the risk of carbon monoxide poisoning and fire hazards. Avoid operating on windy days, as gusts can disrupt temperature control and spread hot oil. Ensure surrounding areas are clear of obstructions to facilitate proper air circulation, maintaining a safe cooking environment.

The Frying Process
Begin by calculating fry time based on the turkey’s weight – typically 3-4 minutes per pound. Slowly lower the turkey into the preheated oil, monitoring temperature consistently.
Calculating Fry Time Based on Turkey Weight
Determining the correct frying time is crucial for a safely cooked and juicy turkey; A general rule of thumb is to calculate approximately 3 to 4 minutes of frying time per pound of turkey. However, this is merely an estimate, and several factors can influence the actual cooking duration.
Always use a meat thermometer to verify internal temperature, as turkey size and oil temperature can vary. It’s essential to regularly check the thermometer throughout the process. Remember, the Char-Broil Infrared Fryer delivers rapid heating, so precise timing is key to avoid overcooking or undercooking.
Slowly Lowering the Turkey into the Oil
Exercise extreme caution when introducing the turkey to the hot oil. Slowly and carefully lower the turkey into the oil using the provided basket and lifting mechanism. This gradual descent minimizes spattering and potential boil-overs, which can be extremely dangerous.
Maintain a controlled speed throughout the entire process. Avoid dropping the turkey quickly, as this can cause a violent reaction. Ensure the turkey is fully submerged, but do not overcrowd the fryer. Monitor the oil level closely during lowering to prevent overflow and maintain safe operation.
Monitoring the Temperature Throughout Cooking
Consistent temperature monitoring is crucial for safe and effective frying. Utilize the thermometer integrated into the Char-Broil Infrared Fryer to maintain the oil temperature between 325°F and 350°F (163°C — 177°C). Fluctuations can impact cooking time and result in an undercooked or overly greasy turkey.
Regularly check the temperature, especially after lowering the turkey, and adjust the burner accordingly. Remember that cooking time varies based on turkey weight, so diligent monitoring is essential for achieving a perfectly cooked bird.
Checking for Doneness
Ensure the turkey reaches a safe internal temperature of 165°F (74°C) using a meat thermometer inserted into the thickest part of the thigh.
Using a Meat Thermometer – Essential for Safety
A meat thermometer is absolutely crucial for verifying the turkey’s internal temperature and ensuring it’s cooked safely. Regularly check the temperature, as cooking times vary based on turkey size. Insert the thermometer into the thickest part of the thigh, avoiding bone contact for an accurate reading.
The target internal temperature must reach 165°F (74°C) to eliminate harmful bacteria. Don’t rely solely on cooking time; always confirm doneness with a thermometer. Consistent monitoring throughout the frying process is essential for a safe and delicious result. This step is non-negotiable for food safety!
Target Internal Temperature: 165°F
Achieving an internal temperature of 165°F (74°C) is paramount for safe turkey consumption. This temperature guarantees the destruction of potentially harmful bacteria, like Salmonella, ensuring a healthy and enjoyable meal for everyone. Use a reliable meat thermometer inserted into the thickest part of the thigh, avoiding contact with bone.
Multiple temperature checks in different locations are recommended for accuracy. Don’t estimate; confirm! Reaching this temperature is non-negotiable for food safety and a worry-free Thanksgiving or holiday feast.

Removing and Resting the Turkey
Carefully lift the turkey basket from the hot oil, using the provided handle. Allow the turkey to rest for 10-15 minutes before carving for optimal juiciness.
Carefully Removing the Turkey Basket
Once the turkey reaches 165°F, it’s time for removal. Exercise extreme caution as the basket and turkey will be incredibly hot. Securely grip the basket handle, ensuring a firm hold to prevent accidental drops. Slowly and steadily lift the basket straight up and out of the hot oil, avoiding any tilting or swinging motions.
Be mindful of any remaining oil clinging to the basket; allow it to drain back into the fryer before transferring the turkey to a large platter. Support the basket’s weight during lifting to prevent strain. Never attempt to remove the turkey while the burner is still active – ensure it’s turned off first for safety.
Resting Period for Optimal Juiciness (10-15 Minutes)
Allowing the fried turkey to rest is crucial for retaining moisture and achieving maximum juiciness. After carefully removing the turkey from the fryer, place it on a large platter, uncovered. Let it rest for a minimum of 10 to 15 minutes before carving.
This resting period allows the juices, which have been forced towards the center during cooking, to redistribute throughout the meat. Cutting into the turkey immediately will result in a significant loss of flavorful juices. Patience during this step guarantees a more tender and succulent final product, enhancing your dining experience.

Cleaning and Maintenance
Proper cleaning extends your fryer’s life. Cool the oil completely, then dispose of it responsibly. Clean all fryer components thoroughly after each use for optimal performance.
Cooling Down and Disposing of Oil
Allow the oil to cool completely before attempting any cleaning or disposal. This is a crucial safety step to prevent severe burns. Cooling can take several hours, so plan accordingly. Once cooled, carefully pour the used oil into a sealed, leak-proof container.
Do not pour used oil down the drain, as it can cause significant plumbing issues and environmental damage. Instead, dispose of it properly at a designated oil recycling center or with your regular waste, following local regulations. Ensure the fryer components are also cooled before cleaning.
Cleaning the Fryer Components
After the oil is disposed of and the fryer is cool, disassemble the components for thorough cleaning. Remove the basket, burner assembly, and any other detachable parts. Wash these components with warm, soapy water, ensuring all oil residue is removed. Avoid abrasive cleaners that could damage the surfaces.
The fryer pot itself can be cleaned similarly, but exercise caution as it may retain heat longer. Wipe down the exterior of the fryer with a damp cloth. Ensure all parts are completely dry before reassembling and storing the fryer.

Troubleshooting Common Issues
If the fryer won’t heat or temperature fluctuates, check the gas supply and burner assembly. Ensure proper ventilation and follow safety guidelines carefully.
Fryer Not Heating Properly
If your Char-Broil Infrared Fryer isn’t heating, begin by verifying the propane tank is full and properly connected. Inspect the hose for any kinks or damage that might restrict gas flow. Ensure the burner assembly is clean and free of obstructions; a clogged burner can prevent ignition.
Check the igniter – is it sparking? If not, replace the battery. Also, confirm the control knob is fully open to the ‘High’ setting during initial ignition. If issues persist, consult the detailed diagrams in your instruction manual for component locations and troubleshooting steps. A faulty regulator could also be the cause.
Oil Temperature Fluctuations
Experiencing oil temperature swings with your Char-Broil fryer? Several factors can contribute. Ambient temperature significantly impacts oil heat retention; colder weather requires longer preheating. Ensure the turkey is thoroughly thawed and dry, as excess water drastically lowers oil temperature. Avoid overcrowding the oil, as adding a large, cold item causes a substantial drop.
Monitor the thermometer closely and adjust the burner accordingly. Wind can also disrupt heating, so position the fryer in a sheltered location. Consistent monitoring and small adjustments are key to maintaining a stable frying temperature throughout the process.

Understanding Char-Broil Trademarks
W.C. Bradley Co. owns trademarks like Caldera, Charcoal2Go, and Char-Broil, registered with the U.S. Patent and Trademark Office, protecting their brand identity.
Caldera, Charcoal2Go, and Other Registered Marks
Char-Broil’s extensive trademark portfolio demonstrates their commitment to brand recognition and product quality. Registered marks include Caldera, known for premium grilling systems, and Charcoal2Go, highlighting portable charcoal options. Other registered trademarks are Char-Broil itself, American Gourmet, Bandera, and Brush Hawg, each representing distinct product lines. CB 940, Char-Diamonds, and Char-Broil Charcoal/Gas further solidify their market presence.
Slogans like “Everybody Grills” and “Infrared Grilling That’s All About U” are also protected, alongside “Keepers,” showcasing Char-Broil’s dedication to innovation and customer satisfaction.
Char vs. Char*: Pointer and Array Differences in C

Char vs. Char: Pointer and Array Differences in C
Understanding the distinction between ‘char’ and ‘char’ is crucial in C programming, impacting how data is handled and manipulated within the fryer’s control system.
Understanding Pointers to Characters
In the context of the Char-Broil Infrared Fryer’s software, a pointer to a character (char*) doesn’t store the character itself, but rather the memory address where the character is located. This is vital for efficiently managing text-based data, like error messages displayed on the control panel or temperature readings.
Essentially, it’s a variable holding an address. Modifying the character through the pointer directly alters the data in that memory location. This differs from a standard character variable, which holds the character’s value directly. Pointers enable dynamic memory allocation and manipulation, crucial for handling variable-length strings within the fryer’s programming.
Arrays of Characters vs. Pointers to Characters
Within the Char-Broil Infrared Fryer’s system, character arrays and pointers to characters serve distinct roles. An array of characters (char[]) allocates a contiguous block of memory to store a fixed-size string, like a pre-defined error message. Conversely, a pointer to a character (char*) holds the address of the first character in a string, allowing for dynamic string manipulation.
While both can represent text, arrays are static in size, while pointers offer flexibility. The fryer’s software might use arrays for constant labels and pointers for user-inputted data or dynamically generated messages, optimizing memory usage and program efficiency.

Memory Management and Char Data Types
The Char-Broil fryer’s control system utilizes C/C++ to handle character arrays, storing data like temperature readings. Pointers efficiently manage memory, crucial for dynamic operations.
How C/C++ Handle Character Arrays
Within the Char-Broil Infrared Fryer’s programming, C/C++ treat character arrays as contiguous blocks of memory, storing text-based data like error messages or temperature unit displays. These arrays, fundamentally, are pointers to the first character.
Although seemingly arrays, C/C++ often handle them as pointers, meaning the array name decays into a pointer to its first element. This impacts memory allocation and manipulation. Understanding this distinction is vital when debugging or modifying the fryer’s firmware.
Arrays of characters, terminated by a null character (‘�’), form strings, essential for user interface elements and data logging within the fryer’s system.
Pointers vs. Variables: A Fundamental Distinction
In the Char-Broil Infrared Fryer’s control system, variables directly store values – like the set temperature or cooking time. Conversely, pointers hold memory addresses where data resides. A pointer to a character (char*) doesn’t contain the character itself, but its location in memory.
This distinction is crucial for efficient data handling. Pointers allow dynamic memory allocation, essential for managing temperature readings or error logs. Variables offer direct access, ideal for constant values.
Understanding this difference aids in troubleshooting firmware issues and optimizing the fryer’s performance.